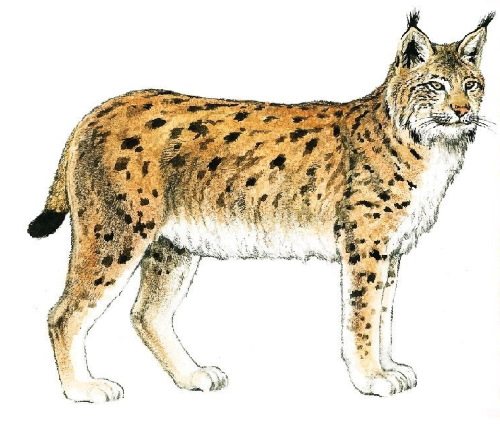
The common lynx is a large and beautiful predator, which has long been known and loved in our vast country. The lynx belongs to the felines, but in appearance I think it resembles a dog in many ways.
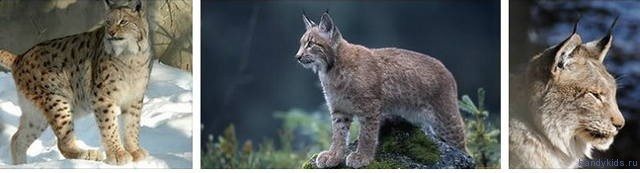
It lives in forests and is an excellent tree climber. This animal, according to Wikipedia, can reach 30 kilograms in weight and 70 centimeters in withers - a big animal!
We, however, are not going to measure, but to draw, and we'll move on to the first lesson how to draw a lynx.
General rules for drawing an animal
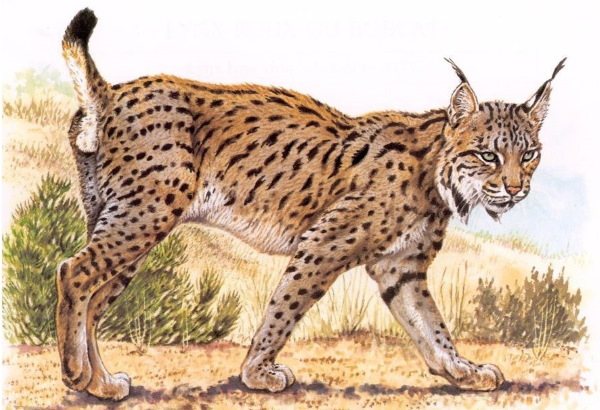
Lynx (drawing for children is suggested to simplify a little in detail) - a big cat, the mysterious master of the forest wilderness. The raptor has fluffy ear tassels, long large paws, a compact body, and a short tail. When drawing it is important not to forget about these differences from other wild representatives of the feline family.
First, it is important for a child to learn to depict the animal proportionally, drawing details of the muzzle, torso, limbs. Then the resulting image on paper is supplemented with a characteristic landscape or details.
The work algorithm is as follows:
- Compositionally determine the character's place on the sheet plane.
- Outline the ovals for the head and torso.
- Elements of the head are drawn step by step, starting with the nose.
- The construction of body parts correlated with the size of paws, head.
- At the very end add strips on the tail, whiskers, ear tassels, fur color lines.
- Color lynx fur, eyes, nose.
- Proceed to detailing the surrounding landscape.
- The drawing is completed by outlining the elements of the foreground, accentuating the eyes, nose, tassels on the ears.
When depicting any living creature, the author involuntarily endows it with a character, some distinctive feature. Successful drawing of animals requires information about some elementary features of the character, its habits, places of habitat.
The lynx is called in literary works "forest shadow". The young artist will be interested in learning more about the life of the unusual predator.
Therefore, at the beginning of the lesson, together with the children study the following facts about lynxes:
- the animal lives in coniferous forests, rocky areas;
- the torso is up to 1.3 m long and weighs 14 to 40 kg;
- the big cat has elongated paws with sharp claws on the ends, which are its main weapon, in addition to its teeth;
- The big cat lurks for a long time in an ambush on the branches of trees, in small gorges among the rocks;
- The lynx has long tassels on its ears, a puffy fur collar and sideburns on its muzzle;
- The fur on the chest and abdomen is white.
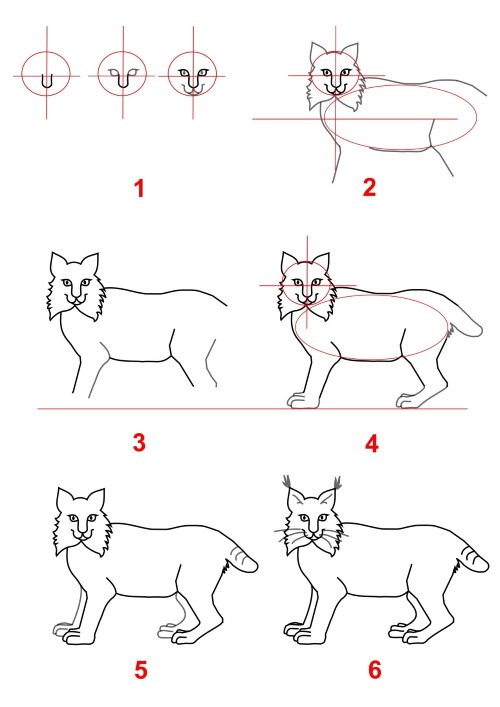
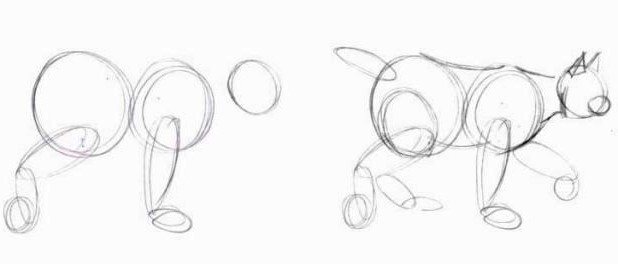
How to draw a lynx step by step: drawing the basic outlines
- Place three circles in the drawing, slightly different in diameter. The smallest will be the head. At some distance from it and slightly below draw the other two (future torso) - the second largest, and then adjacent to him large.
- Perpendicular to the middle circle pull down an oval - a front limb. At the bottom of her horizontally arrange another oval (much smaller in size) - a paw trot. Draw the other foreleg "walking" forward, so it will be perpendicular to the first.
- Draw the hind limbs consisting of three parts with a characteristic bend. Paws should be in the form of circles.
- Draw a rough outline of a muzzle and standing ears-triangles.
- Tail draw a small, shorter than average length.
- Sketch the contours of the torso by drawing the neck, back, and belly lines.
A simple pencil drawing
Lynx (drawing for children is a step-by-step image of the character) it is recommended to start drawing from the central element of the muzzle - the nose. With the help of auxiliary axes and ovals perform the construction of the body, head, paws.
What tools are needed
Use the following set of materials:
- a simple pencil with a soft or hard-soft lead;
- eraser;
- A sheet of heavy paper.
How to draw
A4 paper is placed horizontally, then draw, following the detailed description of the work.
Lynx - drawing for children step by step
The illustration shows more generalized stages of drawing:
| Stage | Description |
| 1 | Slightly to the left of the center of the sheet a small circle is marked, dividing it with thin lines into 4 parts. In the middle of the lower half of the circle outline the nose of the lynx. |
| 2 | At the top of the circle, starting from the ends of the nose lines, symmetrically draw the contours of the eyes. |
| 3 | From the center of the lower part of the nose in semicircles represent parts of the split upper lip, chin. In the center of the eyes - oblong pointed pupils. |
| 4 | Outline rounded head, adding symmetrical ears, fluffy sideburns in the form of triangles with serifs. At the bottom, the lines of the sideburns converge to the lower center point of the chin. |
| 5 | Right and below the circle of the head draw an auxiliary elongated oval for the construction of the body. The axis divides it in half. |
| 6 | From a point on the lower sideburns line draw a curved line depicting the chest and the beginning of the front paw. The back is drawn with 2 connected convex lines starting from a point on the side of the head. The bottom line of the abdomen is drawn right on the border of the auxiliary oval. The thigh of the animal is outlined on the right side of the body, starting from the centerline of the oval. |
| 7 | Starting from the end point of the back, a rounded small tail is drawn. Continue the contours of the front and back paws, making them about the same thickness. At the bottom of each paw depicts three toes, tightly pressed together. To figure look stable, the soles are placed on one level. |
| 8 | Outline paws, located in the background, almost copying the contours of the previously drawn. Cross strokes of coloring are added on the tail. |
How to finish drawing
On the muzzle slightly rounded lines draw long whiskers, going beyond the area of sideburns. Ears are complemented by symmetrical outlines of the inner contour, long fluffy tassels. All auxiliary geometric figures and lines are removed with an eraser. The image of the lynx in a simple pencil is completed. Next, the child can paint the resulting character.
How to draw a lynx: detailing the image
Giving the animal a more realistic appearance, take into account that the lynx though a predator, but should turn out with some cat-like softness, that is, without excessive angularity. To do this, pay attention first of all to the shape of paws. They should be rounded and at the same time big enough. Decorate the muzzle of the lynx in the jaw area with a woolly beard and the ears with tassels. General reliefs of the beast should show that this animal is strong enough (outlines of powerful breast and thigh bones). After the step-by-step performance of all the accompanying sketches of the article, visually showing how to draw a lynx, proceed to the final step - the application of the pattern and "toning" of the animal.
With colored pencils.
Bobcat fur can be brown-gray, golden, reddish, bluish-pepelnoe shade. Small dark spots "scattered" over the body, such coloring helps the predator to remain invisible in the thick of trees and rocky gorges. For their drawings children can choose any coloring version of the animal's fur they like.
What tools will be needed
The child should have the following items ready:
- a thick sheet of paper for pencil sketches;
- eraser;
To draw, a child will need a sketchbook, pencils, and an eraser
- a simple pencil for the outline sketch of the character;
- a set of colored soft pencils or crayons.
How to Draw
Illustrations show exemplary variants of color solutions of the image of the animal. Draw the attention of the young author to different shades of fur, features of combination of spots on wool. It is important to note that the spots are not distributed over the body in a chaotic order - the spots are as if on invisible longitudinal lines running along the body, legs, head and tail.
Together with the child, they select colors for coloring the eyes and nose. Strokes are imposed, trying to convey the texture of the coat of the predator - slate movements should be small, because the lynx has a fairly short fur pile. This method will increase the naturalism of the work.
The paper sheet is placed horizontally on the table, and the center of the composition is determined. When using a 12-color set, a light brown tone is achieved by pressing lightly on the brown slate. Ochre is replaced by a dim orange shading, weakening it in areas of white fur. The table describes in detail the stages of work.
| Stage | Description |
| 1 | On the paper outlines a circle, inside - the transverse axes. Picture the head of the animal. |
| 2 | Following the shape of an auxiliary oval and axes to draw the contours of the body, legs. |
| 3 | Outline the tail, soles, small details of the head. |
| 4 | Unnecessary geometric constructions are removed with an eraser. |
| 5 | Using a sharp yellow pencil, outline the pupils, and then paint the remaining area of the eye iris with green. |
| 6 | Powder pink or light orange is used to paint the nose. |
| 7 | Light brown slate finely shade the head, except for the paranasal area, sideburns, and the inner surfaces of the ears. |
| 8 | The body is shaded in the same color, applying short strokes longitudinally, toward the tail. The belly of a lynx is not colored. |
| 9 | A light brown pencil is used to outline the paws and tail. The pencil is moved over the sheet vertically, in small movements, following the direction of the hair on the limbs. |
| 10 | The ochre-colored pencil is painted over:
|
| 11 | With a dark brown slate outline rounded small spots on the forehead, upper part of the paws, the tip of the tail. |
| 12 | The spots on the sides and under the eyes are made longitudinally, placing them in intermittent strips. |
| 13 | The same color is used to shade sideburns, shade tassels on the ears and focus on the eyes lengthening their slanting form. |
| 14 | The contour of the nose, the outline of the split upper lip and the chin are sharpened in brown. |
| 15 | Small strokes are used to outline the toes and soles at the bottom of the paws. |
| 17 | The volume of the drawing is given by carefully applying dark brown shading to the paws located in the background (in the natural shadow). |
How to complete the drawing
On areas of white fur, shade with gray-brown shading, leaving white (unpainted) illuminated pile. Black pencil work out the whiskers, outline elements of the head, ear tassels. Color spots, located in shaded areas of the body, additionally shaded slightly with a black slate.
In the final work thin black or dark brown marker can emphasize the contours of the entire figure of the predator, soles, eyes, nose.
Lynx on a tree branch
Lynx (the drawing for children can be a little more complicated) is often depicted lying on a tree branch. This is one of the natural positions of the predator.
To capture the image of lynx, you need to carefully build the proportions of the figure of the animal on paper. Drawing auxiliary ovals, axes, observing the ratio of masses of the torso, paws, and head is required.
What tools will be needed
For the lesson we will need:
- heavy A4 paper;
- eraser;
- a pencil with a simple slate, hard or soft;
- Colored crayons or pencils.
How to draw
The position of the animal lying on a tree branch requires a horizontal orientation of the paper sheet. Obligatorily determine the compositional fields of the drawing. For geometric constructions of auxiliary elements one may use a template, compass, or outline suitable rounded objects. The table describes all the steps of drawing in detail.
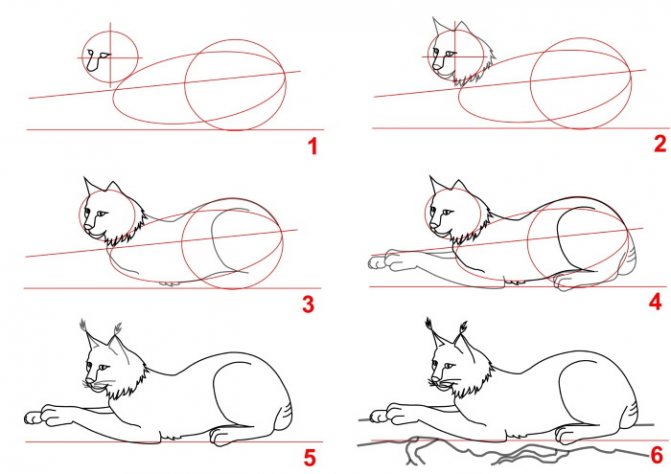
| Step | Description |
| 1 | In the bottom third of the sheet draw a horizontal thin line, it is a reference point for the position of the paws. |
| 2 | Above it, indented, outline a small circle, define the transverse axes. Nearby, just below, depict an oval in contact with it. |
| 3 | At the bottom left of the circle draw a wedge-shaped outline of the nose. On both sides of the nose line in the upper quarter of the circle are drawn slightly slanted rounded eyes. |
| 4 | On both sides of the vertical axis of the head draw ears in the form of a triangular outline. Draw a short line indicating the nose. From three convex lines form chin, upper lip. Add vertical pupils. Trace the head complete zigzag line depicting fluffy sideburns. |
| 5 | The right side of the long subsidiary oval outline another circle. Focusing on the geometric constructions outline curved lines back, abdomen, chest, rounded thigh. |
| 6 | Through the oval, which helps to understand the position of the torso, spend a longitudinal axis just above its geometric center. Draw a front paw, the upper edge touching this axis. The bottom point of the front paw elbow and the sole of the rear paw are on the same line. |
| 7 | The rounded back part of the back is completed by outlining the tail. The toes are drawn on the ends of the paws. |
| 8 | Fine lines of the axes, ovals, circles erase with an eraser. |
| 9 | The head is completed with the following elements:
|
| 10 | Broken line draws the contour of a tree branch, on which the predator lies. |
| 11 | Yellow-green are painted irises, pink-orange - the nose. |
| 12 | Combination of light brown and reddish shades shaded body of the predator. |
| 13 | The tone is darkened at the bottom of the abdomen, on the neck and bends of the limbs. |
| 14 | Dark brown contour hatched areas inside the ears, around the eyes, tassels, shadow on the nose, chin. |
| 15 | The same color is used to outline the spotted fur. |
| 18 | Tree bark is painted in red-brown tone, adding black veins. |
| 19 | White crayon lightens the areas of fur on the muzzle of the animal, on the thighs and on the upper surface of the paws. |
| 16 | In the background they use gray and light green pencils to make a light sketch of other trees. |
| 17 | Long uniform strokes of light blue color paint the sky. |
How to finish a drawing
To make the work look complete, accentuate the outline of the eyes, the details of the head, tassels of the ears with a sharp black slate. Fine shading adds texture to the fur of the animal, tracing the curves of the branch of a tree. Far background leave indistinctly drawn - then in the picture will appear sense of space, volume composition.
The main features of the appearance of the animal
Probably every junior high school student and perhaps even a senior kindergarten student can easily tell how to draw a lynx, and describe how it looks. This is explained by the fact that the representation of kids about the appearance of the animal formed mainly from books about nature, coloring books and educational pictures of teachers. The lynx is rarely mentioned in fairy tales, and is not often seen in cartoon films. The image of the feral cat resembles the common domestic cat in many ways, but there are the following characteristic differences:
- large size;
- long limbs;
- short tail;
- spotted coloration;
- domed ears with tassels on the ends.
Lynx in the woods
The lynx (a drawing for children is created on the basis of photographic material about the animal) can be depicted in the wild, among the woods, in a rocky area. To successfully draw the position of the walking predator, again you need to painstakingly build the proportions of the body, observe the ratios of the main elements of the torso, head, limbs.
What tools are needed
For the work prepare a set of the following items:
- paper thick sheet of A4 format;
- eraser;
- A simple lead pencil marked B or HB;
- A set of colored crayons, pastels, pencils with soft slates.
An interesting variant of drawing can be made if you choose dense kraft paper of light brown color. The shade of the paper sheet will serve as a background for the composition. This type of paper is specially designed for working with different kinds of slates. Broad strokes of colored crayons on Kraft paper can be used to advantageously depict coniferous trees, foliage, and rocks.
How to draw
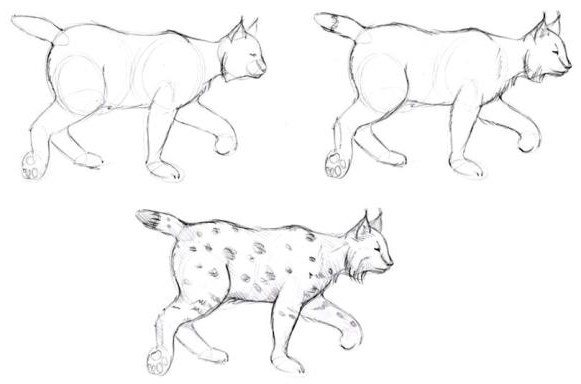
The figure of a lynx occupies a central position in the composition. The leaf can, if desired, be turned vertically or horizontally on the table. First it is necessary to perform auxiliary geometric constructions. The outline of the animal is outlined gradually, correlating it with lines of circles, ovals, axes.
This composition may be difficult for younger schoolchildren, as the lynx is depicted with its left paw extended forward. The limb occupies an elevated, slightly turned toward the viewer. The whole figure of the predator is tilted forward, positioned slightly at an angle.
The first color illustration shows an example of a picture of a lynx, made in detail from a photograph. The second is a child's drawing close to the example. In order to successfully perform the work, the skill of constructing the body of the animal is necessary. It makes sense to practice in advance on separate sheets of paper to depict a standing, lying trot.
The table shows the characteristics of the main stages of drawing.
| Stage | Description . |
| 1 | A small circle with transverse axes is drawn slightly to the left of the center of the sheet. At an angle to it on the right place an elongated oval, about 2 times its mass. At the end of the oval outline another circle, larger than the first. |
| 2 | At the bottom left of the 1st circle outline the nose (wedge-shaped curved line), from the extreme points outline the eyes. |
| 3 | Follow up the other elements of the head, nose, ears. Complete the contour of the head fluffy sideburns. |
| 4 | From the midpoint of the right ear draw a wavy line to the oval, continue it, skirting a second circle. Following the opposite side of the oval, outline the belly of the lynx. |
| 5 | Under the right sideburns from a point on the longitudinal axis of the oval begin to draw a front paw. Almost from the center of the 2nd circle, a convex line draws a thigh. |
| 6 | Complete the drawing of the torso, front and rear paws, making them approximately equal in thickness. |
| 7 | Step down from the intersection point of the axis (in the illustration it is marked in green) and the outline of the oval, put a point. It is connected by a long line to the touch point of the large circle and the oval. This line is continued to the intersection with the inclined axis on which the soles of the animal stand. The intersection point is connected to the touch point of the small circle and the oval. |
| 8 | The resulting acute angle of 2 lines - a reference point for drawing the left paw, pulled forward. It begins to draw from a point on the right sideburns, ending with a zigzag contour to the right paw. |
| 9 | From behind, the second hind limb, a short tail curved upwards, is drawn. The sole of the second hind paw is placed just above the auxiliary inclined axis. |
| 10 | Detail the head of the animal, drawing tassels on the ears, whiskers. The broken connected segments represent a rock, the trunk of the tree growing on the left. |
| 11 | Carefully erase auxiliary geometric shapes and straight lines with the eraser. |
| 12 | Behind the figure of the raptor sketch a forest landscape, the foreground draws the rocks, grass. |
| 13 | Bright orange shaded back, sides, tail lynx. |
| 14 | The same slate painted head, leaving white ears, sideburns and area around the eyes, nose. |
| 15 | Paws partially filled with orange shading. |
| 16 | Bright brown pencil make spots on the coat, placing them longitudinally on the body, limbs. |
| 17 | Light green is painted eyes, dark pink - the nose. |
| 18 | Pale gray partially shade the texture of the coat on the belly, thigh, chest, extended paw. |
| 19 | Light brown shading adds volume to the white fur. |
| 20 | A brown-black tone further darkens the tip of the tail and the spots on the coat located on the paws, the bottom of the head. |
| 21 | Dark pencil is used to clearly trace fingers, soles, pads on the outstretched paw. |
| 22 | Black is used to outline the ears, tassels, eyes and pupils. |
| 23 | Pencil outline accentuate the line of nostrils, mouth, mustache. The ends of the sideburns are darkened. |
| 24 | Unidirectional shading overlay shadow on chest, inner surface of hind paw. Shape the thigh. |
| 25 | Bright light orange crayon highlights the withers area, top of the head, toes, tail. |
| 26 | Shades of gray are densely painted on rocky rocks, blue-gray on the trunk of a tree. For shadows black and dark brown slate is used. |
| 27 | Trees and conifers in the background are drawn in dark green, brown shades. The sky is shaded in blue. |
How to finish a drawing
It is possible to add graphicality to a bright drawing, using a black gel pen. An example of such an outline is shown in the second color illustration. Carefully outline the elements of the head, located in the foreground, pupils, soles and pads of paws. Thin outline is moderately applied to the entire figure of the animal. At the bottom of the rocks in pale orange shading finish drawing the autumn grass.
For children, compositions with different positions of the torso of a lynx will probably prove difficult. It is always worth starting with simple drawings. The step-by-step construction of the animal figure, correlation of image details with geometric elements and axes will help the young artist in creating extraordinary creative works.
Watercolor is lighter after drying.
It is worth considering and remembering that watercolors lighten after drying, for this reason you often need to "thicken" the colors. For this reason, you can add more color after drying and darken the dark spots on the coat. This layer will also become lighter when dry, but the bottom layer will be more saturated. This is a nice and nice perk of glazes